top of page
Harley-Davidson
Digital Feet Case Study

Project Description
H-D has required us to clear numerous production hurdles in order build a CG pipeline for a "major American manufacturer". Below is an overview of some of solutions I've helped to develop over the course of 6 years. From 2014 to 2020 I put a significant amount of effort into developing workflows, the CG pipeline, hundreds of software tools and scripts, asset management tools, standardized material libraries, render workflows, cloud rendering, and researching new tools and technologies capable of meeting the needs of Harley-Davidson.
Roles & Responsibilities
Technology & Innovation Lead
Research & Development
Pipeline & Software Development
Location/Environment Capture
Asset Management
Material Library Creation
3D Artist
Compositing
Digital Fleet
While at Clutch we were able to build a fleet of over 50 CG vehicles. Every year we were responsible for delivering renders, at a high resolution, in every paint and pin combination as well as special configurations for global markets. Often, delivering these renders would mean producing a photo-real render of a bike that wouldn't physically exist for months. This required close collaboration with styling, engineering, and marketing teams deliver images faithful to the eventual real vehicle.


Component Renderings
At Clutch we were able to build and maintain a fleet of over 50 CG vehicles. Every year we were responsible for delivering renders, at a high resolution, in every paint and pin combination as well as special configurations for global markets. Often, delivering these renders would mean producing a a photo-real render of a bike that wouldn't physically exist for months. This required close collaboration with styling, engineering, and marketing teams deliver images faithful to the eventual real vehicle. Having full access to a vehicle's CAD and moving every component along allowed us to peal away a bike to reveal the inner workings of the vehicle. This allowed us to talk about and demonstrate the functionality and systems of a vehicle not just swapping parts and changing paints.

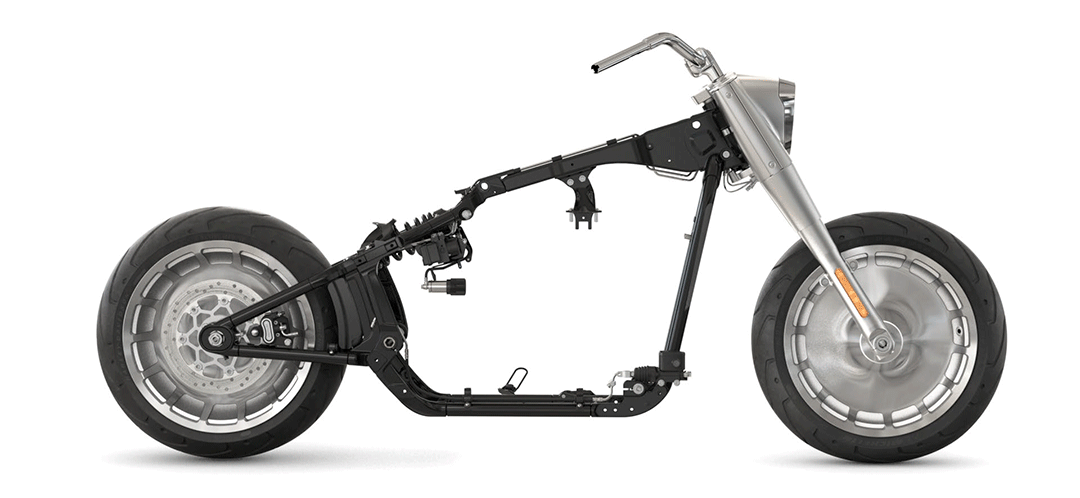

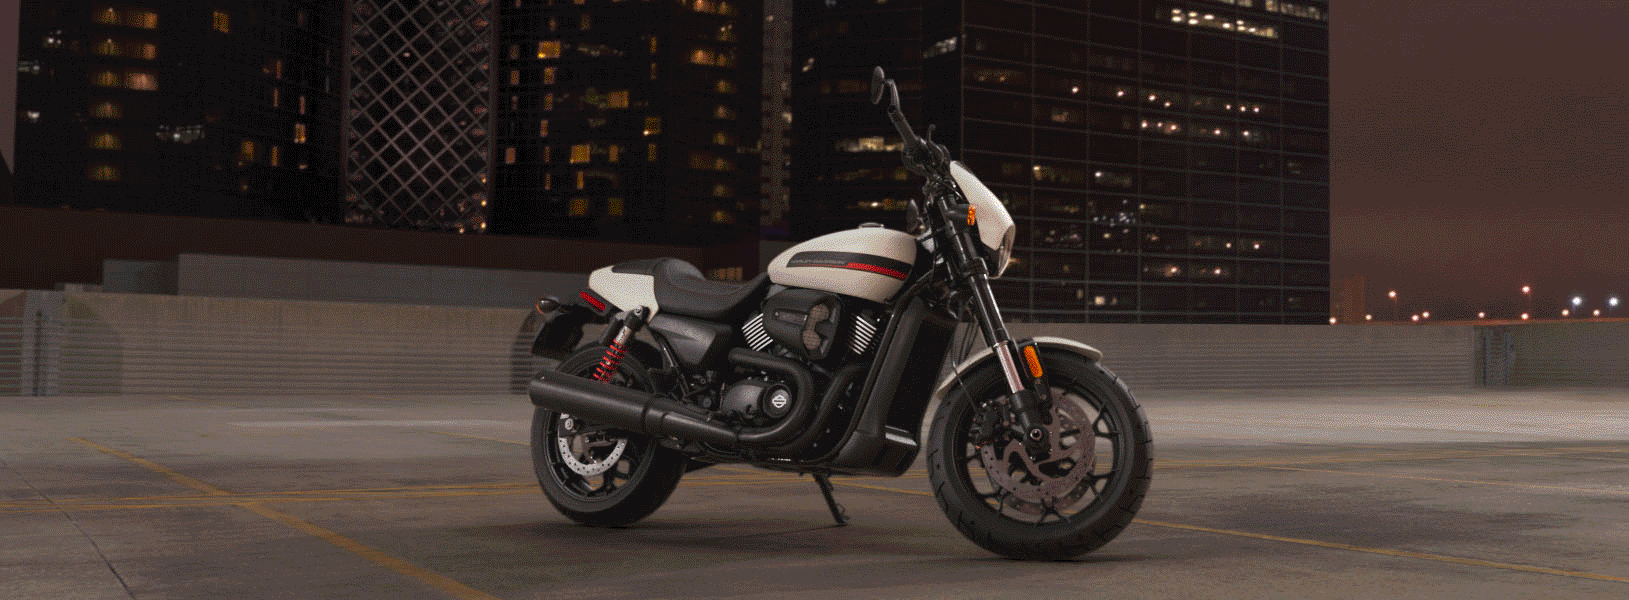
Photo-Realism
At Clutch we were able to build and maintain a fleet of over 50 CG vehicles. Every year we were responsible for delivering renders, at a high resolution, in every paint and pin combination as well as special configurations for global markets. Often, delivering these renders would mean producing a a photo-real render of a bike that wouldn't physically exist for months. This required close collaboration with styling, engineering, and marketing teams deliver images faithful to the eventual real vehicle. To remain as efficient as possible and allow better feedback while doing look dev we began to migrate our fleet to new 3D software packages and render software. A major focus of mine in this migration process was to produce materials that were physically accurate and behaved well under any lighting condition. Part of what allowed us test performance under various lighting conditions was to build a look dev scene and pipeline that included a wide range of lighting scenarios and surfaces to test our materials against.


Interactive Web - 360
The 360's were one of our most consumer facing projects and were consistently one of H-D's most visited sections on the website for many years. Our Photo-real rendering combined with our knowledge of location capture gave Harley-Davidson the ability to set the tone for each vehicle while giving the consumer a true sense of its components, paints, and wheels. The user could control 30 different angles to view the vehicle from walking around the bike to getting on the and looking down at the infotainment system / gauge clusters. These 360's were produced for every vehicle every year up until 2019.


Motion & Animation
We maintained the digital fleet down to every internal component. When presented with the opportunity to tell a story of the customization the new Milwaukee-Eight engine we were able to easily swap components while avoiding the lengthy process of revisiting CAD and processing new assets.

Video Integration & VFX
A benefit of maintaining complete digital fleet is the expense and difficulty in acquiring a physical bike for a shoot or building an elaborate digital set may not be required. Any configuration of the fleet could be rendered and composited into a still or video backplate.

Digital Environments
For a brand that is built on authenticity and where realism lends to that felling we were always pushed to have our environments be a real as possible. As technology progressed our pipeline capabilities and capture techniques improved the realism and flexibility of what the digital asset could offer opened up new areas of exploration. As new types of mediums presented themselves (e.g. WebGL & VR) our capture process and digital environment assets lent us the flexibility to explore and build for these new mediums. Our needs morphed over time to not only be able to produce photo-real images but to allow a camera to be free to move within that environment. That began to open up new ways of exploring narrative and user interaction. With a fully realized 3D environment we could now think of our environment as a set and compose/recompose and utilize different areas of the environment as creative needs dictated. More interestingly, the freedom of movement afforded to the camera naturally lent itself to being used in a real-time game engine and virtual reality. The spontaneity of a goggle wearing user is no longer a problem when an environment is fully realized.


Capture Process
The character of the environment is paramount to defining the feel of the final rendered images and scouting is still a vital step in finding the perfect location. Once a location has been found it needs to captured using a combination of different technologies and techniques. Creating a final digital location can be broken into four stages.
-
The first is the lydar scanning. This stage is integral to establishing the proper scale and providing that first loose point cloud that later becomes important when processing the environment. Having perfect lighting during this stage doesn't matter as these textures are discarded and only the raw point cloud is used.
-
Second is capturing for lighting and texture. Using a DSLR camera we meticulously photograph every square inch of the location. In order to have a surface become part of a 3D model it needs to have at least 3 images taken of it from different angles. As you can imagine this can take quite a long time to complete. To finish the as quickly as possible and to make sure every area has been photographed it is important to plan and choreograph the photography ahead of time. An additional part of this step is the capture of high dynamic range sphericals from various points of the environment and taking a lux reading of the light intensity at that moment.
-
Photogrammetry - At this stage the lydar scan and all the DSLR images are combined using photogrammetry to produce an obscenely detailed model (I've produced models over 3 billion polygons) with textures equal in detail to each individual DSLR photo. The lydar scan serves as an anchor point for the photos saving a significant amount of time manually aligning disparate parts of a scan into a cohesive whole. In this state the model and textures are not usable as a production asset but all the information is there.
-
Processing (models, textures, & sphericals) - As a final stage the models, textures, and sphericals are processed to become production ready assets. Often the best method for early stage cleanup would be to run a mesh through ZBrush to smooth surfaces, plug holes, and remove unneeded geometry. For further preparation I was able to create a Houdini HDA that would decimate the high resolution model to to a target polycount, automatically create UVs and scale and distribute them in UDIM tiles to maintain a target texel density. Textures from the high resolution model would then be baked onto the decimated model's uvs. An important last step for the sphericals would be to adjust their exposure so they would have the same lux reading at render time as the lux reading when we captured the photos. This is a step I've seldom heard other studios perform but it is important for a very specific reason. When placing models in with lights set to real-world intensities (like a vehicle with headlights) the brightness of those lights relative to the environment are correct. Headlights relative to a nighttime spherical will appear bright while headlights turned on in a spherical taken at noon will barely be visible. This process is consistent with my overall philosophy that lights, materials, and objects should all be at real-world intensities, be physically accurate, and be properly scaled so an artist later can combine them and everything will work in a physically accurate photo-real manner.
Capture of the sphericals was a process well established at Clutch and was folded in as a step in the capture process. I was responsible for researching and developing all other aspects of the entire scanning pipeline from start (scanning and photogrammetry) to arriving at a finished 3D environment asset.
Below are images of one of our raw scanned assets.


The following videos demonstrate the seamless integration of a bike from the digital fleet and the digital environment. Most importantly it demonstrates the freedom of movement afforded to the camera to work towards creative ends.


bottom of page